Research: Substance Designer and Unreal Particles
For my research assignment I wanted to create a brick texture in Substance Designer for my Crane model.
Making a Brick Texture in Substance Designer
I started with a new document and set it to 2048 x 2048 in Substance Designer.
First I need to set up a material so I can preview what I want to see on the cube. To do this I make a uniform color node and set it from black to gray.
The reason I chose gray is because it allows me to easily preview the changes I do to the height map as I create the network. Then I rearrange the nodes so they are in this order. Base color, roughness, metalness (metallic), normal, height.
I decided to change the UI a little to get more space for preview and graph.
Next I duplicate the uniform color node with shortcut ctrl D and set the color to black since brick has no metalness value.
I then make a normals node and set the intensity to 10. I just type the number in.
To quickly find nodes I search for them by pressing the tab key.
There are a few thing that you will encounter when you start to play around with Substance Designer. A few things threw me off a lot when I first started using Designer. Sometimes when you connect nodes together you will get a red line. That indicates that two nodes are not compatible. Color nodes need to be converted to grayscale to use them with a grayscale node, and grayscale nodes need to be converted to color when you connect the grayscale into a color node.
So here is an example of the error I was talking about. If you have used Photoshop for a number of years you know that you can add a photograph to create "realistic" textures quickly with a blend mode. So this error was pretty annoying. The blend node becomes a color node if you add a color node to it, or a grayscale node if you add a grayscale node to it. The inputs change colors depending on what type of node the inputs need to be.
Gradient maps turn grayscale inputs to color. Convert to grayscale turn color to grayscale... This took me a few months to catch on, so I hope you don't suffer as much as I did once you read this.
There are many ways to make brick textures in Designer. There are brick nodes, brick materials, and the tile nodes that let you make any material you can think of. The first time I made the bricks for my crane material I used the br
When I make materials I work large to small details. I create the height map first then I color it. To create comments you can right click in the viewport and you will see the options to create a comment or frame. You will want to use comments and frames so you know what each part of your graph is doing at a latter time. This is really necessary if you are sharing your files with other team members.
I played with the materials definition setting to change the tiling of the material You can pick between Parallax Occlusion or Tessellation. There you should see tiling settings.
Here are some quick settings. The luminance random controls the color variation, which your can use to color your bricks and offset their depth.
I am going to use the flood fill nodes to add angle variations to the tiles. I need to use the gradient to convert the first node so the flood fill gradient can use it.
Duplicate the flood fill gradient several times and change the angle.
Next you blend between them and play around with the blend modes and amounts until you find something you like. This system is similar with Photoshop blend modes.
I noticed that the brick is starting to disappear, so I add the brick shape back. I have to use a gradient map to get the inputs to play nice with each other.
Now I want to affect the edges. I want to warp them a little bit. You can use any of the clouds noises. Put a levels and a blur so you can control the clouds filter and isolate them. you can also add a histogram scan or position for further control.
Next I want to add indents (spots) to the bricks. I used Clouds 1 for the noise and used a Histogram Shift to isolate the pattern.
I use levels, invert and a blur to get the noise to look like cracks and soften them as needed. Just using the clouds alone is too strong.
I take the spots and blend them onto the bricks with a Blend node. I chose to use the Multiply blend mode in this case and lowered the opacity to my liking.
The first brick material I made was made with Brick1. The one in this tutorial was made with the tile generator and I pushed it more to be stylized brick. However you can easily switch the nodes to a different one by holding shift and moving the connections to a new node. In this case I moved the connections from the Tile generator to Brick 1 node,
Adding Color
To add color I like to use a gradient map. I hook up the height map I want to color to the input then open the Gradient Editor and click on pick gradient. Then I find an image that has the colors I like for the bricks and sample the colors by dragging across the image.
It looks pretty bad when you first hook up the gradient map to the color
All you have to do is layer several gradient maps nodes together with a blend node. To control the ugly banding I use a blur node. You can use the brick node as a mask in the blend nodes to control where the colors go.
To bake out the maps right click on the graph and select bake outputs as maps and select the folder where you want to save your maps.
Here is the final graph...
Here is the brickNew material. I just drag the new maps into the bricks material instance I had set up.
Here is how the new bricks look in the crane scene.
Adding Smoke
I make an image in Photoshop to be the shape of a smoke particle.
Next I select all and copy and paste the image into the alpha channel.
Then I add a levels to the image and raise the black value to make the background be the average color that is going to be in the smoke. You do this to prevent black outlines in in your textures,
I decided to add a little contrast to the smoke so I duplicated the layer and did a Gaussian Blur on it and set the blending mode to Overlay and 43 percent opacity.
I made a copy of the blurred image and set it to color dodge. I set the opacity to a low value.
I played with the levels a little bit more, then import the image into unreal. I save the image as a targa file with an alpha channel.
Import the texture into Unreal. make a new material, I named mine M_smoke. Select the shader and change the type from opaque to Translucent. change the shading model to unlit to make the particle effect less expensive.
Here is how the particle system looks once the material is applied.
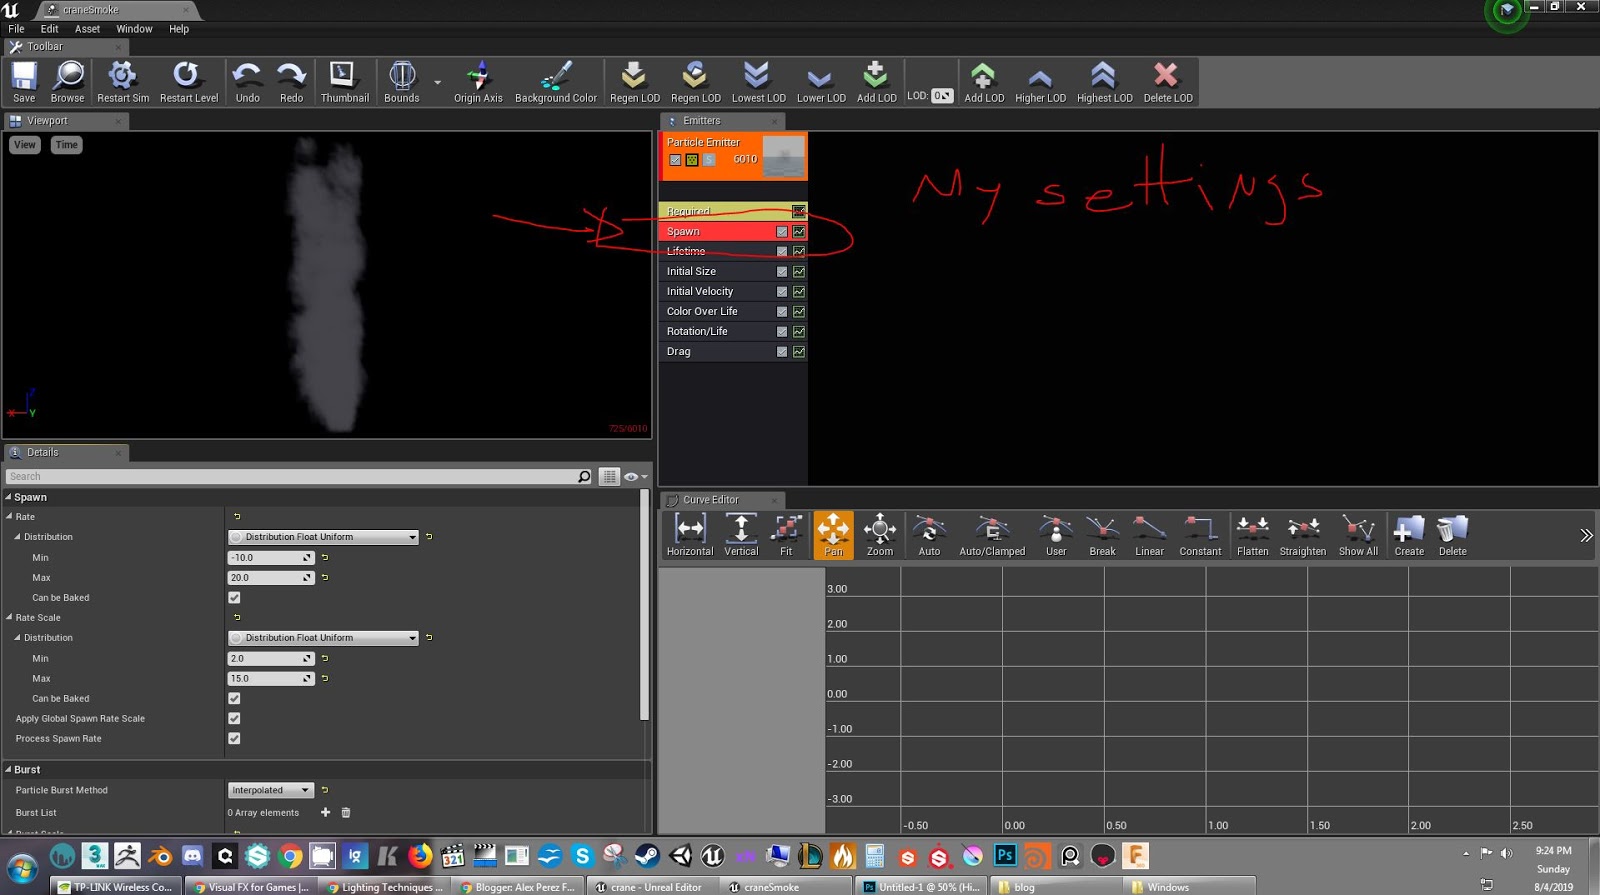
Here are my particle settings for my system.
I just tinkered a little bit until I found something I liked. I wasn't until I added drag to the system the smoke started to look like smoke. Once that happened I had to go back and play with the lifetime, and speed settings to make it fit what I wanted.
I need to figure out how to get the particle color change over time how I want, but other than that I am really happy with the smoke.
Here is the render of the crane with the new brick texture and particles added.